Tuesday, December 29, 2009

Petal Box


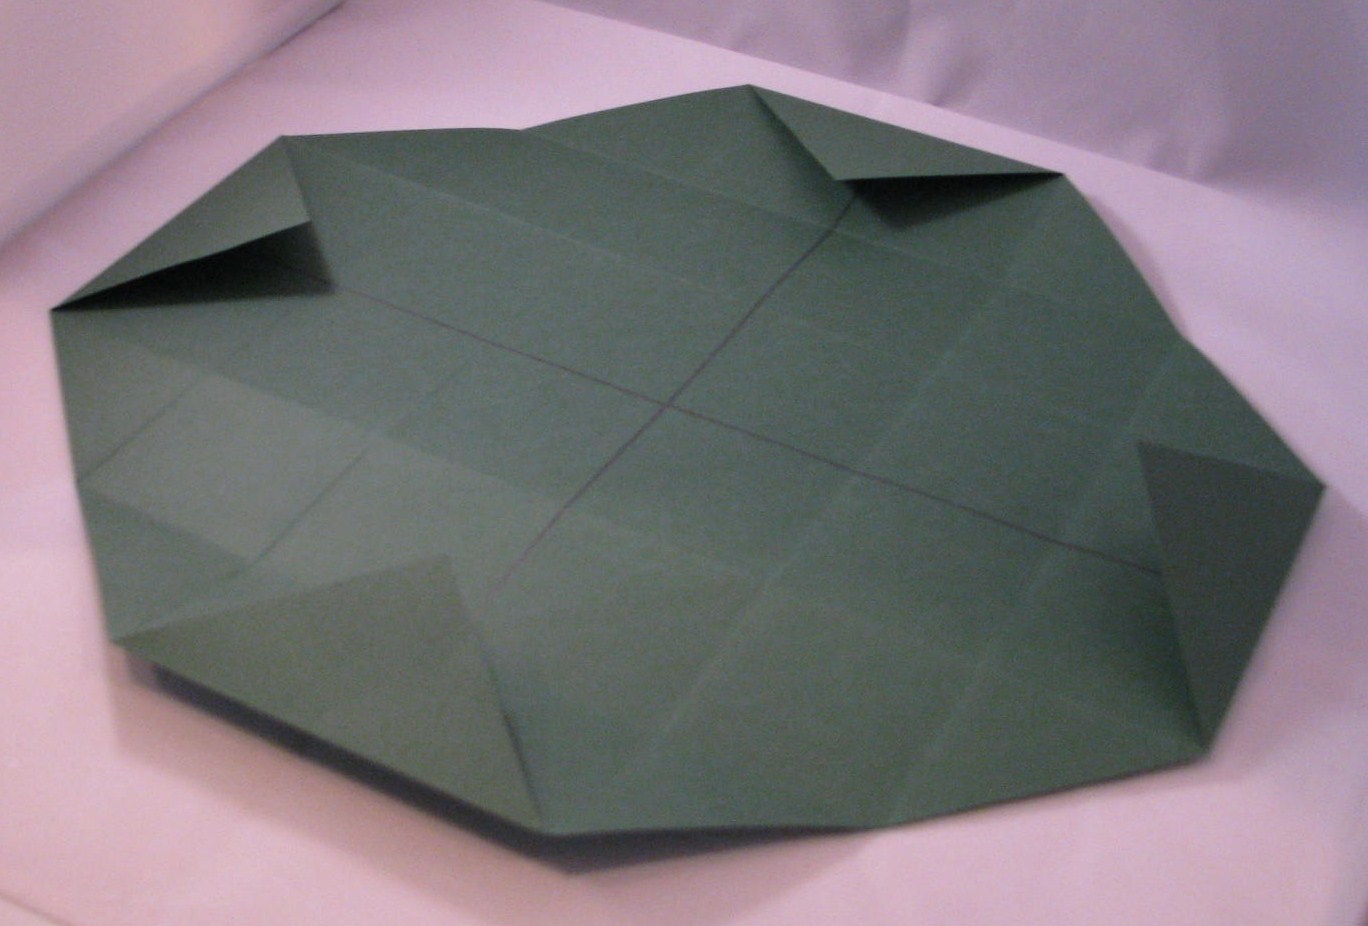
OMG!!  I found my new favorite box.  You can find the tutorial right here:  Petal Box

I followed her instructions except for the dimensions and sizing of the box.  I wanted to make the box a little smaller so my nestibilities would fit.  I have the Classic Scalloped Squares and the largest square is 4"x4" so I needed to make the box a wee bit smaller so the scallops would show from under the box.

You can follow the instructions to a "T" in the tutorial or if you would like a smaller box, here were my alterations:

1. I started with a 10-1/2" x 10-1/2" piece of cardstock instead of a 12x12 piece.
2. Score at 3-1/2" on all 4 sides instead of 4".
3. Cardstock mats should be 3-3/8" x 3-3/8".
4. Designer paper should be 3-1/4" x 3-1/4".
5. Circles should be cut at 3-1/2".

So cute, huh!  The box is so sturdy with all the matting... great for holding that special little something.  Have fun making and thanks for stopping by!


Recipe:
Stamps: Papertrey Holiday Button Bits
Paper:Whisper White, Pink Pirouette, Basic Grey Eskimo Kisses
Ink: Purely Pomegranate
Accessories: SU Rich Razzleberry ribbon, Copics, EK Success Circle Scissor, Classic Scalloped Squares Nestibilities, Bag 'O Buttons, SU Slit Punch, SU Window Punch

* * * * * * * * * * * * * * * * * * * * * * * * * * * * *

Did a little baking while I was at it!  This time of year I feel so compelled to bake and try new recipes... but not so good for the waistline or lack thereof.  Ha!

I found this recipe on the Pillsbury site... and oh so yummy.

Peanutty Buckeye Bars


Ingredients:

1 19.5-oz. pkg. brownie mix
2 eggs
1/3 C. olive oil
1 C. chopped nuts (optional)
1 14-oz. can sweetened condensed milk
1/2 C. peanut butter

Directions:

1. Preheat oven to 350 degrees.  Lightly grease a 13x9x2" baking pan; set aside.  In a large bowl, combine brownie mis, eggs and oil.  Beat w/ an electric mixer on medium speed until combined.  Stir in nuts, if desired.  Spread only half the brownie mixture evenly into the prepared pan.

2. In a medium bowl mix together sweetened condensed milk and peanut butter until smooth.  Spread evenly over brownie mixture in pan.  Separate the remaining brownie mixture into pieces, flatten with your fingers, and place them on top of the brownie mixture in pan.

3. Bake in the preheated oven for 25 to 30 minutes or until top is set and edges are lightly browned.  Cool completely in pan on a wire rack.  Cut into bars.  Makes 32 bars.

4. To Store:  Layer bars between waxed paper in an airtight container and cover.  Store at room temperature for up to 3 days or freeze for up to 3 months.

Hope you enjoy them as much as my husband has!!!

Tuesday, December 15, 2009

Upsy Daisy Cannister Gift


Do you empty a cannister of sugar or hot cocoa or cappucino to stop and think, "how could I alter this?"  And then your thoughts race to who you'd give it to and then what patterned paper could I use!  Oh the joy of papercrafting... the possibilities are endless.  It's an addiction.

I used my Scor pal to score the green cs before wrapping it around the cannister.  I used a slit punch to punch the oval focal point on each side and then looped my ribbon through to attach all the way around then tied a bow.  This little goody is going to a friend of mine who has done some side work for me with a little mishap I had with the "bad boys", if you know what I mean.  I have a lead foot, what can I say.  Are you born with lead feet?

Thanks for stopping by!
Recipe:

Stamps: Upsy Daisy

Paper: Groovy Guava, Garden Green, Very Vanilla

Ink: Basic Black, Grooby Guava, Ruby Red, Basic Black

Accessories: Groovy Guava ribbon, SU window punch, Scor Pal, Bone folder, Oval Nestibilities, Dimensionals, Domino sugar cannister, Corsage pin, Button from stash, SU slit punch

Monday, December 14, 2009

Gingerbread Man


Christmas is only a couple of weeks away and cards should be finished; right!!  I found this gingerbread stamp that I bought last year nestled away, yikes!  I had to take him out and ink him up.  I've had these buttons in my stash for quite some time and worked perfeclty for his little tummy.

Recipe:

Stamps: SU Seasons Greettings, Stampabilities Gingerbread Man

Paper: Very Vanilla, Real Red, Basic Black, Kraft

Ink: Basic Black

Accessories: Circle Nestibilities, SU Top Note Die, SU markers, Buttons from stash, Houndstooth Cuttlebug embossing folder, yarn from stash

Thursday, December 3, 2009

JOY


Christmas is drawing near so production of cards is making way.  I'm a bit behind but luckily I have a stash from last year that can be used.  I used some unexpected colors on this one and to my pleasure, I like.  Sometimes you neva, neva neva know.

Recipe:

Stamps: Snowfall, Glad Tidings, Merry & Bright

Paper: Soft Sky, Whisper White, Basic Black, Pink Passion, Crushed Curry

Ink: Basic Black, Pink Passion, Soft Sky

Accessories: Soft Sky ribbon, Chunky Essentials, Dimensional, Mat Pack, Paper Piercer

Sunday, November 29, 2009

Believe in Santa


Bought the round Nestibilities a few weeks ago at Hobby Lobby... so great... you can use a coupon to get 40% off a set.  I've gone back 4 times now to get the complete circle set and the square set.  I used the largest scallop circle and the next size down plain circle to cut the frame out.  I used  a large EK Success corner rounder punch to creat the scalloped edge of the card... you just remove the U shaped frame from the punch.


Thanks for stopping by!

Recipe:

Stamps: Just Beclause

Cardstock: Garden Green, Real Red, Very Vanilla, Karen Foster dp

Ink: Basic Black

Accessories: Copic and SU markers, SU Chunky Essentials, Papertrey Vintage button, Cuttlebug polka dot emobssing folder, plaind ribbon from stash, EK Success corner rounder punch

Holiday Tags with Top Note Box


Shows you what a 4-day weekend does for ya... I finally finished my December club tags...  Tim, Renee and I hunkered down after the feedfest on Thanksgiving day.  Tim continued to recover from knee surgery while chumming it up with the television and football while the other two sickies in the house slugged Mucinex and Robitussin DM.  With several days to recoup, I think we're all on the road to recovery!!!  Thansgiving has come and gone... now everyone is thinking and planning for the Christmas holiday... yeah, I have lots of projects up  my sleeve and little time.  Yikes!!


For the red and green tags I cut small strips of paper then folded and sewed together.  Cut a small tag to fit inside and embellished.  With the green pendant tags I found it easier to cut out the stamped image first and cut to form the pendant and then adhere to a rectangular piece of the green and then trim the green to mat.

To make the top note die boxes, I used real red cs and the Houndstooth Cuttlebug folder to emboss my paper first.  Then I cut the embossed pieces using the top note die.  Cut to size small white bags I bought from Michaels then sandwiched the bag between two top note pieces and adhered.  Then while flattened, I used my oval punch to punch the handle.  Although I didn't realize until after I had punched all my boxes that the punch caught the sides of the bag as well and punched small pieces out... not a huge deal but next time I think I will pull out the sides of the bag and then do my punching.  I just love these little guys.


Recipe:

Stamps: Just Beclause, Snowfall

Paper: Real Red, Old Olive, Whisper White

Ink: Basic Black

Accessories: SU Top Note die, SU Eyelet Border punch, Papertrey Vintage buttons, Cuttlebug Houndstooth emboss folder, SU large oval punch, twine, silver cording from Hobby Lobby, Michaels ribbon, SU markers, small white bags from Michaels.

BOX - 4-¼ x 4-¼


A girlfriend of mine showed me how to make these cute little boxes several years ago.  I believe she was watching the Carol Duvall Show but for the life of me, can't remember.  The boxes are so versatile and great for that petite little gift that you don't have a box for.  Similar to the origami, I prefer to make this version because you will not have a crease showing on the bottom part and top parts of your lids so if you're particular about your creases you'll appreciate the "no creases".  Here's a short tutorial:

You will need:
* Once piece of 12x12 cardstock (cut down to 11-3/4 x 11-3/4)
* Once piece of 12x12 patterned paper

* Ruler
* Pencil
* Bone folder

1. First, take your 12 x 12 piece of cs and trim off 1/4" on 2 sides to make your piece measure 11-3/4 x 11-3/4 (you want to make the bottom part of your box smaller than the top to keep it from gapping after you put the top part of the box on).  Take your ruler and draw an "X" from corner to corner.


2. Next, you will use the center point of your "X" as a center guide.  You want to take one corner of your paper and fold up to the center of your point.  Then do the same with the remaining 3 corners until you have created a square piece.


3. Next, you will want to fold out the pieces that you just creased as shown below.  Use the fresh creases as another point of reference to fold up each corner to create a new crease as shown in the next picture - repeat with the remaining 3 corners (you will have to fold out your pieces as you go).


4. Here is what the piece looks like after doing the step above.


5. Next, you will use your crease lines for guidance for the last fold, see the picture below.  Once you've completed these folds, you're ready to assemble your box.


6. Next, you will want to cut, taking one corner piece in hand, using your creases for guidance, and cut up to your second crease line.  Do the same thing on the other side only (do not do all 4 sides - see picture below - I have folded up to the crease where I stopped cutting).  You will see the bottom of your box beginning to take shape.  Look at the following pictures to get a visual if you need to.


7. Next, take the two sides that you did not cut and fold them in as shown below.


8. You will see in the picture below that your small corner folds are forming the bottom of your box which makes the box sturdy.


9. Next, you will take the long edges and fold them in on the sides as seen below.


10. Next, you will take the remaining flappy-dos and fold them in.


11. Here is another picture at a different angle showing you the folds.


12. Here is the last fold.


13. DONE!  I always take a bone folder and give those edges an extra crease so they make nice sharp edges and I'll tape down all four corner pieces in the bottom of your box to keep them from coming up. 


14. You can use just the bottom part of your box to put a goodie bag in or you can do this all over again to make the top part of your box.  Remember with the top part of the box, you DO NOT need to cut your cs down, you can leave it as a 12x12 piece.  Repeat the same procedures.  Then embelish the top of the box as you wish!

Let me know if you have any questions or if the tutorial is wonky.  Sometimes it sheds a whole new light when you're the one reading it and trying to figure it out!

Thanks for stopping by!  Until next time...


Sunday, November 22, 2009

Chocolate Chip Cookie Day


Wow, it's been a couple of weeks since I posted something last.  I've been working on some projects and feel like I haven't got anything accomplished.  I picked up this cute little stamp from Michales last week.  I used a small corner rounder punch to create the scallops on the bottom of the tag... you just remove the U shaped base off the punch.  I'm going to post the how to's on how I made the base to fit the cookies inside... a little tutorial a friend showed me years ago... she had seen it on a T.V. show, I believe the Carol Duvall Show on HGTV.

This stamp is right up my alley I must say since my forte is cookie baking.  So I baked up some chcolate chip cookies this weekend.  This little package will go to a co-worker and papercrafting buddie at work.  I'm going to butter her up for some accounting tutoring... I'm taking an accounting class that is NOT my forte.  Bring on the cookies!

Recipe:

Stamps: Hero Arts - Cookie Day

Cardstock: Garden Green, Real Red, dp from stash, possibly Close to My Heart

Ink: Chocolate Chip, Creamy Caramel

Accessories: Copc Sketch E43, SU markers, Jolee's jewels - Swarovski elements, EK Success small corner rounder punch, ribbon from Michaels, twine, celophane bags, buttons, dimentionals

Wednesday, November 4, 2009

Jingle All The Way


A decorative block... one of many things on my list I wanted to make for the holidays.  I so happened to be at Hobby Lobby in the scrapbooking section a few weeks ago and low and behold an entire end isle solely dedicated to these glass blocks, the lights and the stands.  I used Stampin Up's Jingle All the Way Decore Element piece which was a cinch to adhere.  I bought the ribbon at Hobby Lobby too so I guess you could say everything was bought at HL except for the phrase.  Needless to say I've been back to HL several times to purchase more goods. 

What's great about these blocks is that there is already a rectangular hole drilled into the bottom of the block with a plastic cap that goes over the hole so you can fill it with whatever you'd like actually. The blocks are $10, the lights are $4 and the stands are $5 I think but you could use a coupon and save a few bucks.  Just a tip when you buy the lights, make sure you look to see what color the light cording is.  I picked up some lights not even looking and put them in the block... was green cording and I didn't like as much as the white.


I'll be making these using the small square blocks for Renee's teachers for Christmas and I've had a request from my sister-in-law that she'd like one.  I brought the block into work and started a block craze.  I have to say this picture doesn't do the whole ensemble justice, it just lights up the room.

Here is a sideview.

Thanks for stopping by!


Thursday, October 29, 2009

Potpourri


I call this potpourri... these are a few cards I made that just never got posted!

I believe Season of Friendship came out last year in a mini catalog... well, the mini had expired and this was one of those sets that I was going to do whatever I had to to get it in my little hands... I found it on E-Bay and paid $50 bucks for it. And then low and behold, SU brought it back in this year's big catalog. Oh well, huh!!


Recipe:

Stamps: Season of Friendship

Paper: Very Vanilla, Chocolate Chip, Pretty in Pink, Basic Grey and My Minds Eye dp

Ink: Chocolate Chip, Basic Black, So Saffron, Barely Banana, Purely Pomegranate

Accessories: SU Regal Rose 5/8" grosgrain ribbon, twine, brads, 1/2" circle punch, slit punch, dimensionals


This is just one of a couple cards I made for a set similar to the one I posted in February. Set was made for my Grandma who celebrated her 90th birthday in July... Wowza!!!


Recipe:

Stamps: Upsy Daisy

Paper: Very Vanilla, Garden Green, Tempting Turquoise, So Saffron

Ink: Garden Green, Basic Black, Creamy Caramel

Accessories: Very Vanilla 5/8" grosgrain ribbon, SU Eyelet Border punch, Large Oval punch, Paper piercer, Corsage pin, Mat pack and paper piercer, Twine


Recipe:

Stamps: Garden Whimsy

Paper: Whisper White, Basic Black, Elegant Eggplant, Pretty in Pink, DCWV dp

Ink: Basic Black, Pretty in Pink, Elegant Eggplant

Accessories: Elegant Eggplant grosgrain ribbon, Mat pack and paper piercer, buttons, Sponger dauber, Dimensionals

Wednesday, October 28, 2009

Halloween Goody Box for G-Ma


So I recently bought one of Papertrey's Timeless Templates, From The Desk Of, created by the talented Lauren Meader.  I decided to double up on this one so this is actually 2 boxes adhered together.  I must say, they are quite sturdy.


This little treat is for my grandma who recently had a stroke so I thought I might cheer her up with some candy and cookies... it is Halloween!!!


Recipe:

Stamps: Papertrey Spooky Sweets, Happy Halloween by Recollections (Michaels $1 spot)

Paper: Razzleberry Lemonade dp, Groovy Guava, Rich Razzleberry cs

Ink: Basic Black

Accessories: Groovy Guava ribbon, Rich Razzleberry polka dot ribbon, Papertrey Plum Pudding and Vintage buttons, twine, My Timeless Template (From The Desk Of), SU large cellophane bags

Sunday, October 25, 2009

Little Pumpkin


After a rough few days with some sort of flu bug, the clan ventured out to the pumpkin patch... come hook or crook, this was the last weekend so I roughed it a little.  We picked a couple of pumpkins and grabbed a few apples.  We weren't even in the patch for 5 minutes and Renee had to go potty so needless to say it didn't take us long to find a couple of pumpkins.  Ha!

I must say, I love Papertrey's stamp sets and all their button agendas going on... and don't forget about their cardstock.  I never thought I would say this but I love it just as much as SU's cs and everyone knows how great IT is.  There is a new Joanns store in Ballwin and it rocks.  Not sure if it's one of the Etc. stores but it is huge so every department is magnified by what you would think standard is... I picked up a few things such as the polka dot paper; such a sucker for polka dots.

RECIPE:

Stamps: Spooky Sweets by Papertrey

Paper: Paper Pizazz, Me & My BIG Ideas, Vintage Cream cs by Papertrey

Ink: Basic Black, Really Rust, Creamy Caramel

Accessories: Vintage buttons by Papertrey, American Crafts ribbon, hole punch, glue dots, dimensionals, corner rounder, black thread

Monday, October 19, 2009

Accordian Flower Birthday


Accordian flowers... I think I could make these all day long!  I have seen a few tutorials for these amazing creations, but my favorite you can find here:  Accordian Flower.  In this tutorial, I liked the fact that each fold was 1/4" versus a 1/2" or bigger fold but depending on the look you want you might like the larger.  I used Aleene's Quick Dry Tacky Glue so these harden quite nicely.

Well, I gotta run, my 3-year old awaits so check out my recipe below for all products used.

Recipe:
Stamps: SU Garden Collage and A Little Birthday Cheer
Cardstock: SU Very Vanilla, Rich Razzleberry, Pink Pirouette, Razzleberry Lemonade dp
Ink: SU Basic black, Creamy Caramel, So Saffron
Accessories: Aqua Painter, SEI Sweetie button, Rich Razzleberry polka dot ribbon, Dimensionals, Glue Dots

Sunday, October 18, 2009

Halloween Treat Bags


This is Renee's first year of pre-school. I've been waiting for this day when I get to make little treat bags or cupcakes for her class. Renee and I made these Halloween treat bags for her pre-school class of 24 kids!!  I just love the way the faces turned out, especially when Renee was doing the arranging! I thought appropriate, the timeless Papertrey Spooky Sweets stamp set.

Inside each bag is an eraser, rubber ball, a piece of candy, stickers and a magnet. I made the magnets with bottlecaps I had left over from many moons ago. Such a great feeling to know I've used up some old goods I've had stashed away.


I stamped some Halloween images and then punched out with a 1" circle punch. I used my tape runner to attach the image inside the bottle cap.  I filled with Crystal Effects.  On the skull, I attached the googly eyes with glue dots first before filling with CE.  On the spiderweb, I filled with CE then put the spider in while the CE was wet so it would adhere together.

Then on the backside I cut some magnet pieces to fit the back of the bottlecap. 


You can find magnets that have a sticker backing at Michaels or Office Max.

Bag Recipe:
Stamps: Papertrey Spooky Sweets, Recollections (Michaels $1 spot)
Ink: SU Pumpkin Pie and Really Rust
Cardstock: Papertrey Vintage Cream, SU Groovy Guava and Certainly Celery
Accessories: SU Small Oval Punch, Papertrey Spring Moss Swiss Dot Satin Ribbon, Twine, Buttons, Bone Folder

Saturday, October 10, 2009

Fall Wreath


I'm so excited, I love this time of year... cool crispy days, leaves changing colors, and tis the season to get crafty! I new I wanted to make a wreath of some sort. I found these faux distressed pumpkins at Hobby Lobby... hot glued them on a grapevine wreath and made the bow... voila! As hard as I like to make things for myself usually, this was so easy peasy.


Friday, October 9, 2009

First Post


So today's the day I've decided to get my creative juices flowing through a blog. I've been wanting to start a blog for quite sometime now! Thanks for stopping by... I'll have more to come!
So you need a quick gift to a friend or relative? Keep some Quiznos (Quik Trip has great carriers too) drink carriers on hand, wrap some of your favorite papers around it and then fill with whatever you want. This gift was for my mother-in-law who watches our 3 year old daughter... just a little thank you for 3 great years of lots of lovin and tender hugs. Renee started pre-school in August so she misses her so! :-{
I made some of my favorite chocolate chip cookies to go inside... I have such a weakness for baked treats so of course I made them so I could sneak a few too.
If you like plump chewy cookies, here's the recipe:
Gourmet Chocolate Chip Cookies
1 C. Butter, softened
1 C. Dark brown sugar, packed
1 C. Light brown sugar, packed
1 Tbsp. Vanilla extract
2 Eggs
1 tsp. Baking powder
2-1/2 C. Flour
1-1/2 tsp. Salt
4 C. Walnuts, chopped (optional)
3 C. Semi-sweet chocolate chips
Cream butter in a large bowl. Beat in sugar, a little at a time; beat until light. Stir in vanilla extract. Beat in eggs, one at a time. Stir salt into flour and add to butter. Add nuts and chocolate chips. Chill batter for an hour and drop by 1/4 C. measurements on buttered baking sheets. Bake at 375 for 12 - 15 minutes; cool on rack.
Carrier Recipe:
Stamps: Upsy Daisy, Yummy
Cardstock: Basic Black, Very Vanilla, Apricot Appeal, Ginger Blossom (SU) dp
Ink: Ink: Black, Groovy Guava, Ruby Red
Accessories: SU Groovy Guava, Black polka dot ribbon from stash, twine, small hole punch, dimensionals, cello bags from Michaels, drink carrier from Quiznos