Sunday, November 29, 2009

Believe in Santa


Bought the round Nestibilities a few weeks ago at Hobby Lobby... so great... you can use a coupon to get 40% off a set.  I've gone back 4 times now to get the complete circle set and the square set.  I used the largest scallop circle and the next size down plain circle to cut the frame out.  I used  a large EK Success corner rounder punch to creat the scalloped edge of the card... you just remove the U shaped frame from the punch.


Thanks for stopping by!

Recipe:

Stamps: Just Beclause

Cardstock: Garden Green, Real Red, Very Vanilla, Karen Foster dp

Ink: Basic Black

Accessories: Copic and SU markers, SU Chunky Essentials, Papertrey Vintage button, Cuttlebug polka dot emobssing folder, plaind ribbon from stash, EK Success corner rounder punch

Holiday Tags with Top Note Box


Shows you what a 4-day weekend does for ya... I finally finished my December club tags...  Tim, Renee and I hunkered down after the feedfest on Thanksgiving day.  Tim continued to recover from knee surgery while chumming it up with the television and football while the other two sickies in the house slugged Mucinex and Robitussin DM.  With several days to recoup, I think we're all on the road to recovery!!!  Thansgiving has come and gone... now everyone is thinking and planning for the Christmas holiday... yeah, I have lots of projects up  my sleeve and little time.  Yikes!!


For the red and green tags I cut small strips of paper then folded and sewed together.  Cut a small tag to fit inside and embellished.  With the green pendant tags I found it easier to cut out the stamped image first and cut to form the pendant and then adhere to a rectangular piece of the green and then trim the green to mat.

To make the top note die boxes, I used real red cs and the Houndstooth Cuttlebug folder to emboss my paper first.  Then I cut the embossed pieces using the top note die.  Cut to size small white bags I bought from Michaels then sandwiched the bag between two top note pieces and adhered.  Then while flattened, I used my oval punch to punch the handle.  Although I didn't realize until after I had punched all my boxes that the punch caught the sides of the bag as well and punched small pieces out... not a huge deal but next time I think I will pull out the sides of the bag and then do my punching.  I just love these little guys.


Recipe:

Stamps: Just Beclause, Snowfall

Paper: Real Red, Old Olive, Whisper White

Ink: Basic Black

Accessories: SU Top Note die, SU Eyelet Border punch, Papertrey Vintage buttons, Cuttlebug Houndstooth emboss folder, SU large oval punch, twine, silver cording from Hobby Lobby, Michaels ribbon, SU markers, small white bags from Michaels.

BOX - 4-¼ x 4-¼


A girlfriend of mine showed me how to make these cute little boxes several years ago.  I believe she was watching the Carol Duvall Show but for the life of me, can't remember.  The boxes are so versatile and great for that petite little gift that you don't have a box for.  Similar to the origami, I prefer to make this version because you will not have a crease showing on the bottom part and top parts of your lids so if you're particular about your creases you'll appreciate the "no creases".  Here's a short tutorial:

You will need:
* Once piece of 12x12 cardstock (cut down to 11-3/4 x 11-3/4)
* Once piece of 12x12 patterned paper

* Ruler
* Pencil
* Bone folder

1. First, take your 12 x 12 piece of cs and trim off 1/4" on 2 sides to make your piece measure 11-3/4 x 11-3/4 (you want to make the bottom part of your box smaller than the top to keep it from gapping after you put the top part of the box on).  Take your ruler and draw an "X" from corner to corner.


2. Next, you will use the center point of your "X" as a center guide.  You want to take one corner of your paper and fold up to the center of your point.  Then do the same with the remaining 3 corners until you have created a square piece.


3. Next, you will want to fold out the pieces that you just creased as shown below.  Use the fresh creases as another point of reference to fold up each corner to create a new crease as shown in the next picture - repeat with the remaining 3 corners (you will have to fold out your pieces as you go).


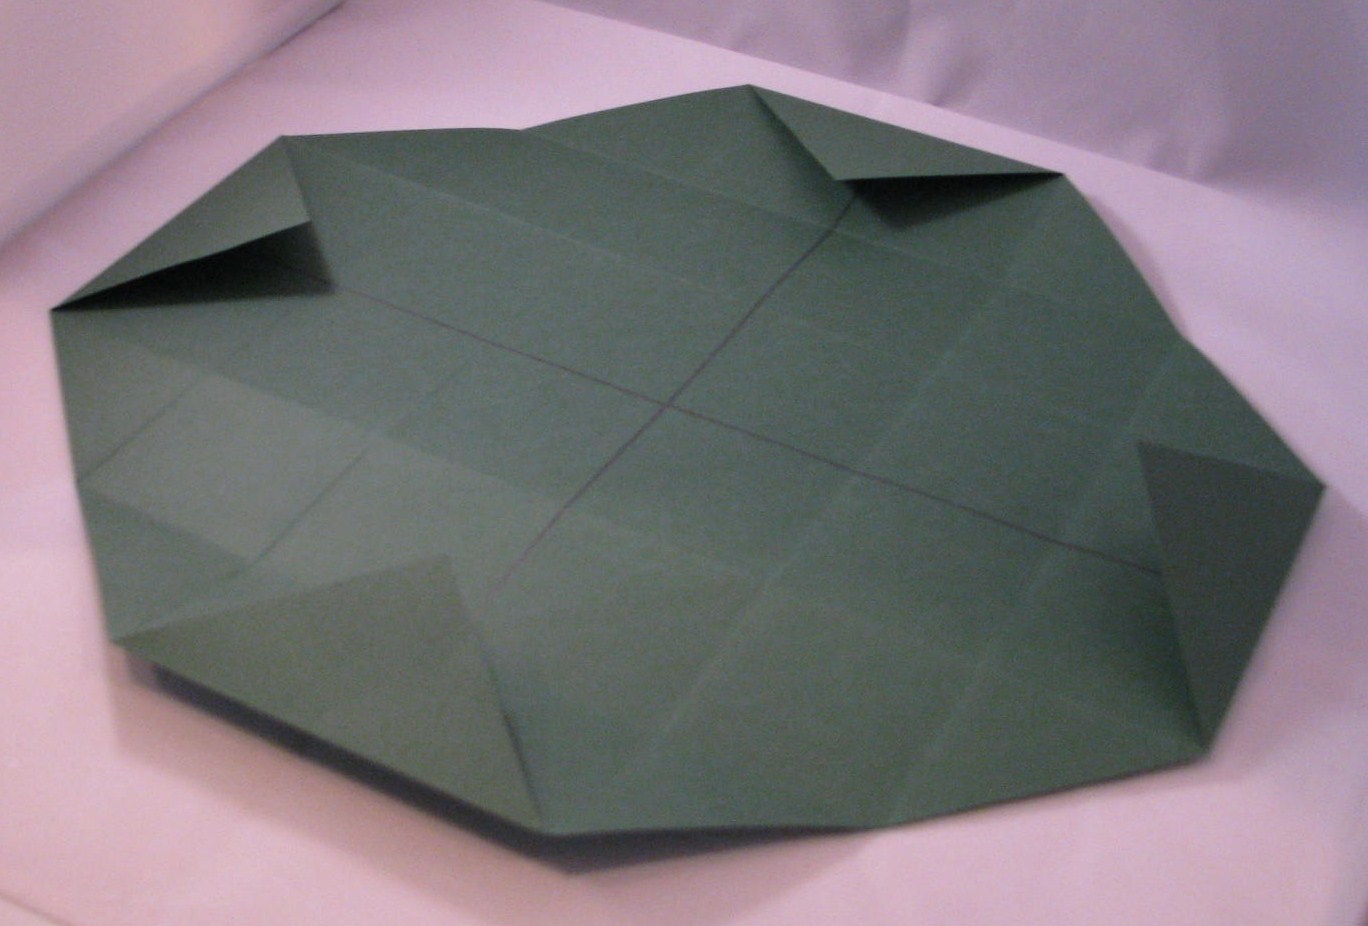
4. Here is what the piece looks like after doing the step above.


5. Next, you will use your crease lines for guidance for the last fold, see the picture below.  Once you've completed these folds, you're ready to assemble your box.


6. Next, you will want to cut, taking one corner piece in hand, using your creases for guidance, and cut up to your second crease line.  Do the same thing on the other side only (do not do all 4 sides - see picture below - I have folded up to the crease where I stopped cutting).  You will see the bottom of your box beginning to take shape.  Look at the following pictures to get a visual if you need to.


7. Next, take the two sides that you did not cut and fold them in as shown below.


8. You will see in the picture below that your small corner folds are forming the bottom of your box which makes the box sturdy.


9. Next, you will take the long edges and fold them in on the sides as seen below.


10. Next, you will take the remaining flappy-dos and fold them in.


11. Here is another picture at a different angle showing you the folds.


12. Here is the last fold.


13. DONE!  I always take a bone folder and give those edges an extra crease so they make nice sharp edges and I'll tape down all four corner pieces in the bottom of your box to keep them from coming up. 


14. You can use just the bottom part of your box to put a goodie bag in or you can do this all over again to make the top part of your box.  Remember with the top part of the box, you DO NOT need to cut your cs down, you can leave it as a 12x12 piece.  Repeat the same procedures.  Then embelish the top of the box as you wish!

Let me know if you have any questions or if the tutorial is wonky.  Sometimes it sheds a whole new light when you're the one reading it and trying to figure it out!

Thanks for stopping by!  Until next time...


Sunday, November 22, 2009

Chocolate Chip Cookie Day


Wow, it's been a couple of weeks since I posted something last.  I've been working on some projects and feel like I haven't got anything accomplished.  I picked up this cute little stamp from Michales last week.  I used a small corner rounder punch to create the scallops on the bottom of the tag... you just remove the U shaped base off the punch.  I'm going to post the how to's on how I made the base to fit the cookies inside... a little tutorial a friend showed me years ago... she had seen it on a T.V. show, I believe the Carol Duvall Show on HGTV.

This stamp is right up my alley I must say since my forte is cookie baking.  So I baked up some chcolate chip cookies this weekend.  This little package will go to a co-worker and papercrafting buddie at work.  I'm going to butter her up for some accounting tutoring... I'm taking an accounting class that is NOT my forte.  Bring on the cookies!

Recipe:

Stamps: Hero Arts - Cookie Day

Cardstock: Garden Green, Real Red, dp from stash, possibly Close to My Heart

Ink: Chocolate Chip, Creamy Caramel

Accessories: Copc Sketch E43, SU markers, Jolee's jewels - Swarovski elements, EK Success small corner rounder punch, ribbon from Michaels, twine, celophane bags, buttons, dimentionals

Wednesday, November 4, 2009

Jingle All The Way


A decorative block... one of many things on my list I wanted to make for the holidays.  I so happened to be at Hobby Lobby in the scrapbooking section a few weeks ago and low and behold an entire end isle solely dedicated to these glass blocks, the lights and the stands.  I used Stampin Up's Jingle All the Way Decore Element piece which was a cinch to adhere.  I bought the ribbon at Hobby Lobby too so I guess you could say everything was bought at HL except for the phrase.  Needless to say I've been back to HL several times to purchase more goods. 

What's great about these blocks is that there is already a rectangular hole drilled into the bottom of the block with a plastic cap that goes over the hole so you can fill it with whatever you'd like actually. The blocks are $10, the lights are $4 and the stands are $5 I think but you could use a coupon and save a few bucks.  Just a tip when you buy the lights, make sure you look to see what color the light cording is.  I picked up some lights not even looking and put them in the block... was green cording and I didn't like as much as the white.


I'll be making these using the small square blocks for Renee's teachers for Christmas and I've had a request from my sister-in-law that she'd like one.  I brought the block into work and started a block craze.  I have to say this picture doesn't do the whole ensemble justice, it just lights up the room.

Here is a sideview.

Thanks for stopping by!